Difference between revisions of "Maps"
m (add links) |
(→Map 1 - Shrewsbury to Hartlebury: add links) |
||
| (14 intermediate revisions by 2 users not shown) | |||
| Line 4: | Line 4: | ||
|+Schematic Map of the SVR | |+Schematic Map of the SVR | ||
| | | | ||
| − | [[File:BSicon | + | [[File:BSicon KBHFalocal.png|25px]] [[Bridgnorth]] |
<br/> | <br/> | ||
| − | [[File: | + | [[File:BSicon_eHSTlocal.png|25px]] [[Eardington | Eardington Halt]] (Disused) |
<br/> | <br/> | ||
| − | [[File: | + | [[File:BSicon_HSTlocal.png|25px]] [[Hampton Loade]] |
<br/> | <br/> | ||
| − | [[File: | + | [[File:BSicon_HSTlocal.png|25px]] [[Country Park Halt]] |
<br> | <br> | ||
| − | [[File: | + | [[File:BSicon_HSTlocal.png|25px]] [[Highley]] and [[The Engine House]] |
<br> | <br> | ||
| − | [[File: | + | [[File:BSicon_HSTlocal.png|25px]] [[Arley]] |
<br> | <br> | ||
| − | [[File: | + | [[File:BSicon WBRÜCKE+GRZqlocal.png|25px]] [[Victoria Bridge]] |
<br> | <br> | ||
| − | [[File: | + | [[File:BSicon_HSTlocal.png|25px]] [[Northwood Halt]] |
<br> | <br> | ||
| − | [[File: | + | [[File:BSicon_eABZlglocal.png|25px]] [[Wyre Forest Line | Tenbury Branch]] (Disused) |
<br> | <br> | ||
| − | [[File: | + | [[File:BSicon_HSTlocal.png|25px]] [[Bewdley]] |
<br> | <br> | ||
| − | [[File: | + | [[File:BSicon_eABZrflocal.png|25px]] [[Stourport Branch]] (Disused) |
<br> | <br> | ||
| − | [[File: | + | [[File:500px-BSicon TUNNEL1local.png|25px]] [[Bewdley Tunnel]] |
<br> | <br> | ||
| − | [[File: | + | [[File:BSicon_ABZrflocal.png|25px]] [[Connection to Network Rail]] |
<br> | <br> | ||
| − | [[File: | + | [[File:BSicon_KBHFelocal.png|25px]] [[Kidderminster]] |
|- | |- | ||
|} | |} | ||
| Line 41: | Line 41: | ||
|- | |- | ||
| | | | ||
| − | [[File: | + | [[File:BSicon_STRlocal.png|25px]] To Chester |
<br/> | <br/> | ||
| − | [[File:BSicon | + | [[File:BSicon DSTlocal.png|25px]] [[Coton Hill Yard]] |
<br/> | <br/> | ||
| − | [[File: | + | [[File:BSicon_ABZrglocal.png|25px]] Crewe Jct (To Crewe) |
<br/> | <br/> | ||
| − | [[File: | + | [[File:BSicon BHFlocal.png|25px]] [[Shrewsbury]] |
<br/> | <br/> | ||
| − | [[File:BSicon_ABZgl+ | + | [[File:BSicon_ABZgl+llocal.png|25px]] Severn Bridge Jct (To Wellington) |
<br/> | <br/> | ||
| − | [[File: | + | [[File:BSicon_ABZrflocal.png|25px]] [[Sutton Bridge Junction | Sutton Bridge Jct]] (To Welshpool, Craven Arms) |
<br/> | <br/> | ||
| − | [[File: | + | [[File:BSicon_HSTlocal.png|25px]] [[Berrington]] |
<br/> | <br/> | ||
| − | [[File: | + | [[File:BSicon_HSTlocal.png|25px]] [[Cound Halt]] |
<br/> | <br/> | ||
| − | [[File: | + | [[File:BSicon_HSTlocal.png|25px]] [[Cressage]] |
<br/> | <br/> | ||
| − | [[File: | + | [[File:BSicon DSTlocal.png|25px]] [[Sand Pit siding at Buildwas]] |
<br/> | <br/> | ||
| − | [[File: | + | [[File:BSicon_vSTRg+rlocal.png|25px]] [[Wellington to Craven Arms Railway|To Much Wenlock, Craven Arms]] |
<br/> | <br/> | ||
| − | [[File: | + | [[File:BSicon_vBHFlocal.png|25px]] [[Buildwas]] |
<br/> | <br/> | ||
| − | [[File: | + | [[File:BSicon_SPLelocal.png|25px]] |
<br/> | <br/> | ||
| − | [[File: | + | [[File:BSicon_ABZlflocal.png|25px]] Buildwas Jct ([[Wellington to Craven Arms Railway|To Madeley Jct, Wellington]]) |
<br/> | <br/> | ||
| − | [[File: | + | [[File:BSicon DSTlocal.png|25px]] [[Bower Yard Lime Kilns Siding]] |
<br/> | <br/> | ||
| − | [[File: | + | [[File:BSicon_HSTlocal.png|25px]] [[Ironbridge and Broseley]] |
<br/> | <br/> | ||
| − | [[File: | + | [[File:BSicon DSTlocal.png|25px]] [[Jackfield sidings]] |
<br/> | <br/> | ||
| − | [[File: | + | [[File:BSicon_HSTlocal.png|25px]] [[Jackfield Halt]] |
<br/> | <br/> | ||
| − | [[File: | + | [[File:BSicon DSTlocal.png|25px]] [[Maw and Co's Siding]] |
<br/> | <br/> | ||
| − | [[File: | + | [[File:BSicon_HSTlocal.png|25px]] [[Coalport]] |
<br/> | <br/> | ||
| − | [[File: | + | [[File:BSicon DSTlocal.png|25px]] [[Coalport Brick & Tile Works Siding]] |
<br/> | <br/> | ||
| − | [[File: | + | [[File:BSicon_HSTlocal.png|25px]] [[Linley]] |
<br/> | <br/> | ||
| − | [[File: | + | [[File:500px-BSicon TUNNEL1local.png|25px]] [[Bridgnorth Tunnel]] |
<br/> | <br/> | ||
| − | [[File:BSicon | + | [[File:BSicon BHFlocal.png|25px]] [[Bridgnorth]] |
<br/> | <br/> | ||
| − | [[File: | + | [[File:BSicon DSTlocal.png|25px]] [[Knowlesands Sidings]] |
<br/> | <br/> | ||
| − | [[File: | + | [[File:BSicon_HSTlocal.png|25px]] [[Eardington]] |
<br/> | <br/> | ||
| − | [[File: | + | [[File:BSicon_HSTlocal.png|25px]] [[Hampton Loade]] |
<br/> | <br/> | ||
| − | [[File: | + | [[File:BSicon DSTlocal.png|25px]] [[Alveley Sidings]] |
<br/> | <br/> | ||
| − | [[File: | + | [[File:BSicon_HSTlocal.png|25px]] [[Alveley Halt]] |
<br/> | <br/> | ||
| − | [[File: | + | [[File:BSicon_HSTlocal.png|25px]] [[Highley]] |
<br/> | <br/> | ||
| − | [[File: | + | [[File:BSicon_DSTlocal.png|25px]] [[Kinlet and Billingsley Sidings signal box|Kinlet Sidings]] |
<br/> | <br/> | ||
| − | [[File: | + | [[File:BSicon_HSTlocal.png|25px]] [[Arley]] |
<br/> | <br/> | ||
| − | [[File: | + | [[File:BSicon WBRÜCKE+GRZqlocal.png|25px]] [[Victoria Bridge]] |
<br/> | <br/> | ||
| − | [[File: | + | [[File:BSicon_HSTlocal.png|25px]] [[Northwood Halt]] |
<br/> | <br/> | ||
| − | [[File: | + | [[File:BSicon_ABZlglocal.png|25px]] [[Bewdley North signal box|Bewdley Jct North]] (To [[Tenbury Wells]], [[#Map 2 - Bewdley to Kidderminster|Map 2]]) |
<br/> | <br/> | ||
| − | [[File: | + | [[File:BSicon_HSTlocal.png|25px]] [[Bewdley]] |
<br/> | <br/> | ||
| − | [[File: | + | [[File:BSicon_ABZlflocal.png|25px]] [[Bewdley South signal box|Bewdley Jct South]] (To [[Kidderminster]], [[#Map 2 - Bewdley to Kidderminster|Map 2]]) |
<br/> | <br/> | ||
| − | [[File: | + | [[File:500px-BSicon TUNNEL1local.png|25px]] [[Mount Pleasant Tunnel]] |
<br/> | <br/> | ||
| − | [[File: | + | [[File:BSicon_HSTlocal.png|25px]] [[Burlish Halt]] |
<br/> | <br/> | ||
| − | [[File: | + | [[File:BSicon DSTlocal.png|25px]] [[National Cold Stores Siding|Brindley Street Siding]] |
<br/> | <br/> | ||
| − | [[File: | + | [[File:BSicon_ABZlglocal.png|25px]] [[Burlish Branch]] |
<br/> | <br/> | ||
| − | [[File: | + | [[File:BSicon_BHFlocal.png|25px]] [[Stourport]] |
<br/> | <br/> | ||
| − | [[File: | + | [[File:BSicon_ABZrflocal.png|25px]] To [[Stourport Power Station]] |
<br/> | <br/> | ||
| − | [[File: | + | [[File:BSicon DSTlocal.png|25px]] [[Wilden Sand Siding]] |
<br/> | <br/> | ||
| − | [[File: | + | [[File:BSicon DSTlocal.png|25px]] [[Leapgate Private Sidings]] |
<br/> | <br/> | ||
| − | [[File: | + | [[File:BSicon_ABZrglocal.png|25px]] [[Hartlebury Junction | Hartlebury Jct]] (To [[Kidderminster]]) |
| + | <br/> | ||
| + | [[File:BSicon_HSTlocal.png|25px]] [[Hartlebury]] | ||
| + | <br/> | ||
| + | [[File:BSicon_STRlocal.png|25px]] To Worcester | ||
|- | |- | ||
|} | |} | ||
| Line 140: | Line 144: | ||
|- | |- | ||
| | | | ||
| − | [[File: | + | [[File:BSicon_STRlocal.png|25px]] To Leominster |
<br/> | <br/> | ||
| − | [[File: | + | [[File:BSicon_HSTlocal.png|25px]] [[Wyre Forest Line#Woofferton | Woofferton]] |
<br/> | <br/> | ||
| − | [[File: | + | [[File:BSicon_ABZlflocal.png|25px]] Woofferton Jct (To Ludlow) |
<br/> | <br/> | ||
| − | [[File: | + | [[File:BSicon_HSTlocal.png|25px]] [[Wyre Forest Line#Easton Court | Easton Court]] |
<br/> | <br/> | ||
| − | [[File: | + | [[File:BSicon_HSTlocal.png|25px]] [[Wyre Forest Line#Tenbury Wells | Tenbury Wells]] |
<br/> | <br/> | ||
| − | [[File: | + | [[File:BSicon_HSTlocal.png|25px]] [[Wyre Forest Line#Newnham Bridge | Newnham Bridge]] |
<br/> | <br/> | ||
| − | [[File: | + | [[File:BSicon_HSTlocal.png|25px]] [[Wyre Forest Line#Neen Sollars | Neen Sollars]] |
<br/> | <br/> | ||
| − | [[File: | + | [[File:BSicon_HSTlocal.png|25px]] [[Wyre Forest Line#Cleobury Mortimer | Cleobury Mortimer]] |
<br/> | <br/> | ||
| − | [[File: | + | [[File:BSicon_ABZlflocal.png|25px]] [[Cleobury Mortimer and Ditton Priors Light Railway]] |
<br/> | <br/> | ||
| − | [[File: | + | [[File:BSicon_HSTlocal.png|25px]] [[Wyre Forest Line#Wyre Forest | Wyre Forest]] |
<br/> | <br/> | ||
| − | [[File: | + | [[File:BSicon WBRÜCKE+GRZqlocal.png|25px]] [[Dowles Bridge]] |
<br/> | <br/> | ||
| − | [[File: | + | [[File:BSicon_ABZrglocal.png|25px]] [[Bewdley North signal box|Bewdley Jct North]] (To [[Bridgnorth]], [[#Map 1 - Shrewsbury to Hartlebury|Map 1]]) |
<br/> | <br/> | ||
| − | [[File: | + | [[File:BSicon_BHFlocal.png|25px]] [[Bewdley]] |
<br/> | <br/> | ||
| − | [[File: | + | [[File:BSicon_ABZrflocal.png|25px]] [[Bewdley South signal box|Bewdley Jct South]] (To [[Hartlebury]], [[#Map 1 - Shrewsbury to Hartlebury|Map 1]]) |
<br/> | <br/> | ||
| − | [[File: | + | [[File:BSicon_eHSTlocal.png|25px]] [[Rifle Range Halt]] |
<br/> | <br/> | ||
| − | [[File: | + | [[File:500px-BSicon TUNNEL1local.png|25px]] [[Bewdley Tunnel]] |
<br/> | <br/> | ||
| − | [[File: | + | [[File:BSicon_HSTlocal.png|25px]] [[Foley Park Halt]] |
<br/> | <br/> | ||
| − | [[File:BSicon | + | [[File:BSicon DSTlocal.png|25px]] [[Foley Park sidings]] |
<br/> | <br/> | ||
| − | [[File: | + | [[File:BSicon DSTlocal.png|25px]] [[H. Whitehouse's Sand Siding]] |
<br/> | <br/> | ||
| − | [[File: | + | [[File:BSicon_ABZlglocal.png|25px]] [[Kidderminster Shed]] |
<br/> | <br/> | ||
| − | [[File: | + | [[File:BSicon_ABZlglocal.png|25px]] [[Kidderminster Junction signal box#Kidderminster Junction | Kidderminster Jct]] (To Hartlebury) |
| + | <br/> | ||
| + | [[File:BSicon_BHFlocal.png|25px]] [[Kidderminster]] | ||
| + | <br/> | ||
| + | [[File:BSicon_STRlocal.png|25px]] To Stourbridge Junction | ||
|- | |- | ||
|} | |} | ||
| Line 186: | Line 194: | ||
== Geographic map of the preserved SVR == | == Geographic map of the preserved SVR == | ||
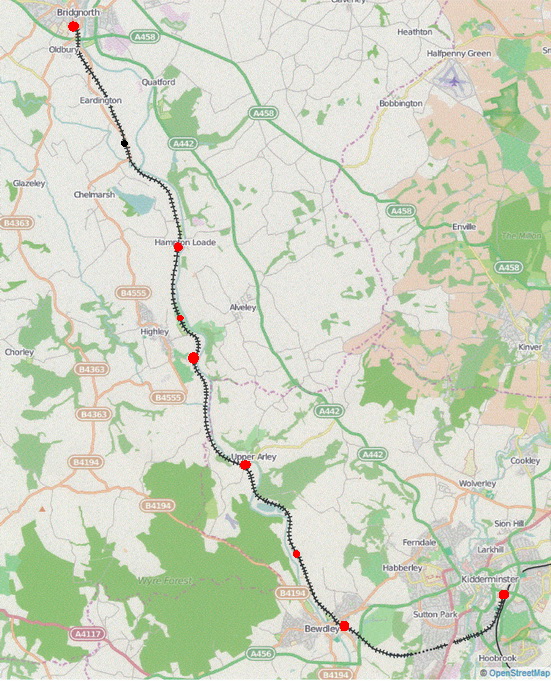
| − | + | Click on any station or station name to go to that station's page. | |
| + | <br> | ||
| + | <imagemap> | ||
| + | Image:Svrline-stat2.jpg | ||
| + | rect 50 5 105 20 [[Bridgnorth]] | ||
| + | circle 74 27 10 [[Bridgnorth]] | ||
| + | rect 75 92 130 107 [[Eardington]] | ||
| + | circle 124 144 10 [[Eardington]] | ||
| + | rect 140 235 225 250 [[Hampton Loade]] | ||
| + | circle 180 317 10 [[Country Park Halt]] | ||
| + | rect 130 325 180 340 [[Highley]] | ||
| + | circle 194 358 10 [[Highley]] | ||
| + | rect 225 450 280 465 [[Arley]] | ||
| + | circle 245 465 10 [[Arley]] | ||
| + | circle 296 555 10 [[Northwood Halt]] | ||
| + | rect 300 620 350 635 [[Bewdley]] | ||
| + | rect 455 570 520 585 [[Kidderminster]] | ||
| + | circle 504 596 10 [[Kidderminster]] | ||
| + | </imagemap> | ||
| − | + | [[Category:The Severn Valley Railway under GWR/BR ownership]] | |
Revision as of 15:07, 25 July 2022
Schematic Map of the preserved SVRSevern Valley Railway
|
|
Schematic maps of the pre-closure SVRSevern Valley Railway
Map 1 - Shrewsbury to Hartlebury
|
|
Map 2 - Woofferton to Kidderminster
|
|
Geographic map of the preserved SVRSevern Valley Railway
Click on any station or station name to go to that station's page.