Difference between revisions of "Maps"
(→Map 1 - Shrewsbury to Hartlebury: add Buildwas sand pit siding) |
(→Map 1 - Shrewsbury to Hartlebury: add links) |
||
| (5 intermediate revisions by 2 users not shown) | |||
| Line 61: | Line 61: | ||
[[File:BSicon DSTlocal.png|25px]] [[Sand Pit siding at Buildwas]] | [[File:BSicon DSTlocal.png|25px]] [[Sand Pit siding at Buildwas]] | ||
<br/> | <br/> | ||
| − | [[File:BSicon_vSTRg+rlocal.png|25px]] To Much Wenlock | + | [[File:BSicon_vSTRg+rlocal.png|25px]] [[Wellington to Craven Arms Railway|To Much Wenlock, Craven Arms]] |
<br/> | <br/> | ||
[[File:BSicon_vBHFlocal.png|25px]] [[Buildwas]] | [[File:BSicon_vBHFlocal.png|25px]] [[Buildwas]] | ||
| Line 67: | Line 67: | ||
[[File:BSicon_SPLelocal.png|25px]] | [[File:BSicon_SPLelocal.png|25px]] | ||
<br/> | <br/> | ||
| − | [[File:BSicon_ABZlflocal.png|25px]] Buildwas Jct (To Madeley Jct, Wellington) | + | [[File:BSicon_ABZlflocal.png|25px]] Buildwas Jct ([[Wellington to Craven Arms Railway|To Madeley Jct, Wellington]]) |
<br/> | <br/> | ||
| − | [[File:BSicon DSTlocal.png|25px]] [[ | + | [[File:BSicon DSTlocal.png|25px]] [[Bower Yard Lime Kilns Siding]] |
<br/> | <br/> | ||
[[File:BSicon_HSTlocal.png|25px]] [[Ironbridge and Broseley]] | [[File:BSicon_HSTlocal.png|25px]] [[Ironbridge and Broseley]] | ||
<br/> | <br/> | ||
| − | [[File:BSicon DSTlocal.png|25px]] [[Jackfield | + | [[File:BSicon DSTlocal.png|25px]] [[Jackfield sidings]] |
<br/> | <br/> | ||
[[File:BSicon_HSTlocal.png|25px]] [[Jackfield Halt]] | [[File:BSicon_HSTlocal.png|25px]] [[Jackfield Halt]] | ||
| Line 119: | Line 119: | ||
[[File:BSicon_HSTlocal.png|25px]] [[Burlish Halt]] | [[File:BSicon_HSTlocal.png|25px]] [[Burlish Halt]] | ||
<br/> | <br/> | ||
| − | [[File:BSicon DSTlocal.png|25px]] [[ | + | [[File:BSicon DSTlocal.png|25px]] [[National Cold Stores Siding|Brindley Street Siding]] |
<br/> | <br/> | ||
[[File:BSicon_ABZlglocal.png|25px]] [[Burlish Branch]] | [[File:BSicon_ABZlglocal.png|25px]] [[Burlish Branch]] | ||
| Line 126: | Line 126: | ||
<br/> | <br/> | ||
[[File:BSicon_ABZrflocal.png|25px]] To [[Stourport Power Station]] | [[File:BSicon_ABZrflocal.png|25px]] To [[Stourport Power Station]] | ||
| + | <br/> | ||
| + | [[File:BSicon DSTlocal.png|25px]] [[Wilden Sand Siding]] | ||
<br/> | <br/> | ||
[[File:BSicon DSTlocal.png|25px]] [[Leapgate Private Sidings]] | [[File:BSicon DSTlocal.png|25px]] [[Leapgate Private Sidings]] | ||
| Line 211: | Line 213: | ||
circle 504 596 10 [[Kidderminster]] | circle 504 596 10 [[Kidderminster]] | ||
</imagemap> | </imagemap> | ||
| + | |||
| + | [[Category:The Severn Valley Railway under GWR/BR ownership]] | ||
Revision as of 15:07, 25 July 2022
Schematic Map of the preserved SVRSevern Valley Railway
|
|
Schematic maps of the pre-closure SVRSevern Valley Railway
Map 1 - Shrewsbury to Hartlebury
|
|
Map 2 - Woofferton to Kidderminster
|
|
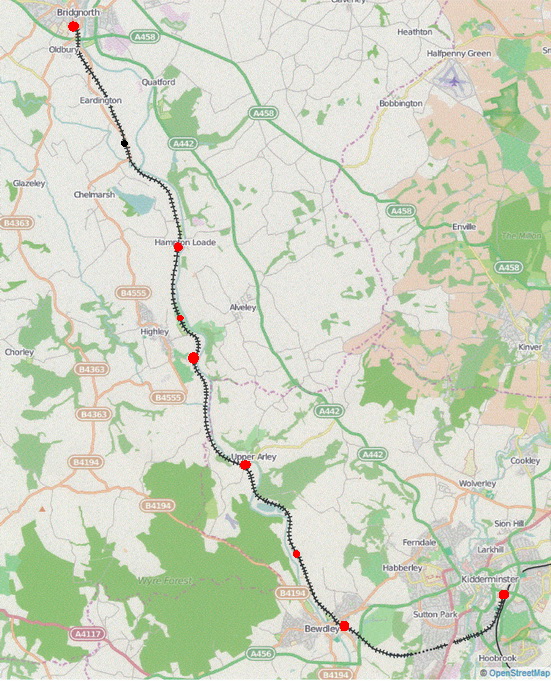
Geographic map of the preserved SVRSevern Valley Railway
Click on any station or station name to go to that station's page.