Bewdley North signal box
_-_geograph.org.uk_-_1255884.jpg)

A signal box at Bewdley, working to Bewdley South, Arley and Highley. Bewdley North signal box has interesting arrangements in that it works to Bewdley South by Absolute Block on the main line (platforms 1 & 2), by direction levers under ETT Regulations on the Back Road (platform 3) with the Rock Siding and Down Yard operated as through sidings.
Operation to Arley (short section) or Highley (long section) is carried out under ETT Regulations.
Bewdley North, like Highley and Bewdley South on the SVR, boasts a lever frame installed long before the line's preservation. It is a 37 lever GWR 3-bar horizontal tappet frame with 5" centres between the levers, meaning the frame is noticeably longer than that at Bewdley South despite having only three more levers. With the exception of the distant levers, which are painted yellow in accordance with practice since the late 1920s, the levers are painted in line with GWR instructions from the Edwardian period, with goods line signals having a central black stripe on otherwise red levers, and the Back Road signal levers being painted to indicate relief lines, with half black/half red levers.
The signal box is the only place in the world still utilising 'pegging' (i.e. capable of giving a line clear to the box in rear) GWR Spagnoletti block instruments on the standard gauge. The Back Road instrument is a non-pegger over pegger double deck instrument, whilst the Up and Down Main instruments are single deck separate pegger and non-peggers, originating from Marshbrook Signal Box on the Shrewsbury - Hereford line.
Contents
Diagram

Signalling diagram as shown on the svrsig website. There are a few inaccuracies: The banner repeater on Bewdley Station Footbridge for 29 signal was removed some years ago. Ground signals 25 and 27 are actually miniature semaphore arms (see below). The layout at Bewdley North has been extensively altered in preservation to better suit modern needs and account for the loss of the Tenbury Line. A diagram of Bewdley North at 1956 may be seen here: svrsig.org
Levers and Lever leads

Levers 1 to 11
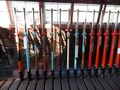
Levers 7 to 18
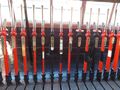
Levers 16 to 28
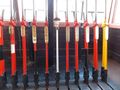
Levers 28 to 37


List of levers
| No. | Colour | Description | Lever Sequence |
|---|---|---|---|
| 1 | Yellow | From Shrewsbury Distant [Electric Switch] | 2 3 |
| 2 | Red | From Shrewsbury Home | 14 12 11 5 or 11 5 |
| 3 | Red+White Band | Up Main Inner Home | 11 10 5 |
| 4 | Red | Up Main to Back road Inner Home | 15 14 12 11 10 5 |
| 5 | Blue | FPL For Nº6 | |
| 6 | Black | Up And Down Main Facings | +Over |
| 7 | Red/Black | Tenbury Siding Start'g (Disc) | 9 |
| 8 | Blue | F.P.L. For Nº6 | Nil or 6 |
| 9 | Blue/Brown | Interl'k'g Lever For Tenbury Siding | |
| 10 | Red+White Band | Disc At Nº12 | 12 21 14 11 or 15 14 12 11 Or 11 |
| 11 | Blue | F.P.L. For Nº12 | Nil Or 12 21 14 or 14 12 |
| 12 | Black | Up Main Facing To Back Road | |
| 13 | White | ||
| 14 | Blue | F.P.L. For Nº21 | Nil |
| 15 | Blue/Brown | Interl'k'g Lever With Bewdley South For Back Road | 17 16 |
| 16 | Red | Up Main To Back Road Calling On | 15 14 12 11 10 5 |
| 17 | Red | Up Main Calling On | 11 10 5 |
| 18 | Red | Up Main To Loop Siding Inner Home (Disc) | 12 21 14 11 10 5 |
| 19 | Red | Back'g From Up Main To Down Main (Disc) | 6 5 |
| 20 | Red+White Band | Back'g Up Main Down Main | |
| 21 | Black | Back Road Facing To Loop | 12 |
| 22 | Red+Black Band | Disc For Nº21 | 12 21 |
| 23 | Red | Back'g From Down Main To Sidings | 24 or 24 6 |
| 24 | Black | Down Main Nº1 Down siding | |
| 25 | Red+Black Band | Disc For Nº24 | 24 |
| 26 | Black | Nº1 Down Siding Nº2 Siding | 24 |
| 27 | Red+Black Band | Disc For Nº26 | 24 26 |
| 28 | Red+White Band | To Shrewsbury Start'g | |
| 29 | Red | Up Main To Shrewsbury Start'g | |
| 30 | Red+Black Band | Back Road To Shrewsbury Inner Home | 12 |
| 31 | Red | Down Main To Shrewsbury Inner Home | 6 8 |
| 32 | White | ||
| 33 | Red | Down Main To Tenbury Siding Inner Home | 8 9 |
| 34 | Red | Down Main Calling On | 8 or 6 8 |
| 35 | Red+Black Band | Back Road Home | 13 14 |
| 36 | Red | Down Main Home | 8 or 6 8 |
| 37 | Yellow | 36 31 28 |
History before preservation
Construction of the two signal boxes at Bewdley was authorised by the GWR Board in October 1877 as part of the opening of the Kidderminster Loop Line. They were the first 'proper' signal boxes on the Severn Valley Railway, all other boxes dating from after 1880[1]. There is uncertainty as to whether the current Bewdley North and Bewdley South are these original 1877/78 built boxes, or marginally later replacements.
The original McKenzie and Holland lever frame was replaced on 25 June 1908 with a 37-lever GWR horizontal tappet frame, which remains in use. The box was raised bodily by around a foot in 1954 to allow greater space beneath the lever frame[2], to accommodate alterations that took place in a 1955 resignalling, which saw the arrival of the box's 'gallows' centre-pivot signal bracket immediately outside that has become an iconic part of the Bewdley scene. The additional courses of bricks used were of a different colour, and can be seen in the first photograph above.
Bewdley North box also controlled traffic on the Tenbury Branch. Passenger services on the branch ended in 1962 and the line was officially closed in January 1964 with occasional traffic to the Admiralty depot at RNAD Ditton Priors finally ending in April 1965. Electric token working between Bewdley North and Cleobury Mortimer was withdrawn on 8 May 1965[3].
Signalling controlled from the box
All signals controlled by Bewdley North are of late GWR/BR(W) steel tubular post design with enamel arms. Signals 29, 31 and 33 are of unusual centre pivot design, used where a conventional design signal's sighting may be compromised. These have wooden arms, although they are otherwise of the late GWR/BR(W) steel tubular post design. Signals 30, 31, 33, 35 and 36 are pre-preservation, although originally signal 30 had a sister arm on its bracket, the place for which can still be seen. Signals 25 and 27 are rare early 20th century GWR miniature arm signals that evolved into the more familiar disc. These followed the signals that swivelled 90 degrees on a vertical access giving a simple red or green plate and lamp indication. These were usually worked in tandem with the point rather than independently by a separate lever.
Signals 1 and 37, the Up and Down Distants respectively, are motor worked. Signal 37 is mounted beneath Bewdley South's signal 6, and is electrically slotted.
Lamp Room and plinth
SVR News issue 112 included an article, “The Lamp Room at Bewdley North Signal Box” by John Marshall. The article referred to a plinth which is situated adjacent to the north end of Bewdley North signal box. The plinth is set on foundations sunk into the embankment, with blue brick walls and a concrete deck supported on jack arches. It can be seen in this photograph.
The original article provided the information that in February 1896, the GWR Traffic Committee authorised the construction of a corrugated iron lamp room at Bewdley, and also the construction of additional toilet accommodation (probably the original urinal on platform 2), at a total cost of £100. The article suggested that this lamp room was situated on the plinth, and included a copy of a photograph taken in May 1922 and reproduced on p40 of SVR News 112. This shows a view of the signal box looking northwards; visible behind it is the corner of a corrugated iron shed with a curved roof[4].
While the suggestion of the use of the plinth for the lamp room appeared uncontroversial, the article led to a number of letters in subsequent issues discussing the origins of the plinth. A letter from Michael V.E. Dunn in SVR News 113 suggested that the plinth appeared over-engineered for a simple corrugated iron lamp room, and that it may have been the base of an earlier signal box. John Marshall responded in the following edition, pointing out that the jack arches were typical construction of the very late 19th century (i.e. post 1880), and the detailed GWR Survey of 1890, which included the 1887-88 signal box, showed no structure in the position now occupied by the plinth. He also stated that prior to the construction of the signal box, signalling and points were controlled from small ground frames and line-side levers only.
The publication of The Tenbury and Bewdley Railway by Keith Beddoes and William H. Smith in 1995 provided the information that earlier signal boxes were built at both the north and south ends of Bewdley in 1864. This resulted in a further letter from Michael Dunn in SVR News 118 again suggesting the plinth as the possible site of the north box. The following issue brought a response from Keith Beddoes, noting that the itemised cost for the north end “one signal box at the junction £8-10-0” did not refer either to foundation work or indeed a ground frame, making it likely that it was just a small wooden hut to cover an existing ground frame.
Signal Box S and T Plates

The front of Bewdley North box has two plates showing the letters ‘S’ and ‘T’. These were used in early times to indicate that the signals and telegraph were functioning correctly, indicated by white letters on a black background. In the event of a failure which the signalman could not rectify himself, reversing a plate to display a red letter on a white background would act as a visual request to the guard of a passing train to notify the appropriate maintenance staff at the nearest station.[5]

Bewdley North displaying a Signal failure warning (1 April 2017)

The introduction of telephones, first minuted by the GWR on the SVR in 1906, would have rendered this process unnecessary. However plates survived on some boxes on branch lines as late as the 1960s[6], therefore their inclusion on a box in the era represented by the SVR is not wholly inappropriate.
The plates on Bewdley North Box were installed in September 1995, but were hung on existing mountings[5].
See also
References
- ↑ Marshall (1989), p128
- ↑ Marshall (1989), p135
- ↑ Beddoes & Smith (1995) pp. 196-198.
- ↑ SVR News 112, “The Lamp Room at Bewdley North Signal Box”, John Marshall
- ↑ 5.0 5.1 SVR News 116, letter from John Marshall citing “The Signal Box”, Oxford Publishing Co 1986
- ↑ SVR News 118, letter from Michael V.E. Dunn citing British Railway Journal, October 1983