Bewdley South signal box


A signal box at Bewdley, working to Bewdley North and Kidderminster. Bewdley South signal box has interesting arrangements in that it works to Bewdley North by Absolute Block on the main line (platforms 1 & 2), by direction levers under ETT Regulations on the Back Road (platform 3), with the Rock Siding and Down Yard operated as through sidings. Operation to Kidderminster is via Acceptance Lever.
The box passed almost immediately from British Rail's care into the hands of the SVR, and this coupled with the only minor alterations the track layout it controls has undergone, means it is one of the most 'original' signal boxes in preservation, retaining its 1923 lever frame, pre-preservation block shelf and rear wall furniture, including a token instrument cupboard (one of the originals working either to Stourport, Kidderminster or Bewdley North via the Back Road) and cupboards, phone board and train register desk, complete with curve worn into it by generations of signalmen leaning against it! The box also contains a table, box stool, and short bench which possibly date to pre-preservation days. Two armchairs and a GWR table chair ex-Gloucester S&T offices provided in 1993 complete the furnishings.
The box won a National Railway Heritage Award, the Westinghouse Signalling Award, in 2007.[1] The box and the privy situated adjacent to it are both included on the Wyre Forest District Council Local Heritage List.

Award won by Bewdley South signal box
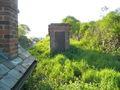
Privy


Contents
Diagram

Signalling diagram in Bewdley South. The circles on the diagram are track circuit indicators, which light in the presence of a train (or failure of a track circuit), the pilot light in bottom right being constantly lit to indicate that the power is on.

The office copy of the GWR/BR-era diagram for Bewdley South. The diagram shows alterations to remove the signals and points for the Down Yard. The SVR was given control of the yard before BR ceased running services to Bewdley, and it is thought that the pointwork for the yard was never physically removed. Instead, it is theorised that the removal of these features of the diagram was done to indicate to signalmen that they were not to be used under any circumstances [2].
Labelled diagram of Block Shelf

The lever frame and block shelf at Bewdley South. The descriptions for the labelled items are as follows:
- A: Signal arm repeaters for Lever 0 (Down Distant, top indicator) and Lever 1 (Down Home, bottom indicator)
- B: Signal lamps repeater
- C: Possession key for Bewdley South-Kidderminster section, removed from the instrument to protect the line during engineering work, etc.
- D: Block bell from Kidderminster
- E: Block instrument to Bewdley North for Up and Down main
- F: Block bell to Bewdley North for Up and Down main
- G: Block instrument to Bewdley North for Back Road
- H: Block bell to Bewdley North for Back Road
- I: Track circuit indicator for "Tunnel Track" (extends between the distants at Bewdley South and Kidderminster, either side of Bewdley Tunnel)
- J: Up train accepted (by Kidderminster) indicator
- K: Lever 27 Free/Locked indicator (locks Lever 27 Reversed when Bewdley North clears the Backing Signal on the Down Main)
- L: Signal 30 approach locking Free/Locked indicator
- M: Signal arm repeater for signal 30 (Up Starting)
- N: Signal arm repeater for signal 33 (Up Main Distant)
With the exception of B, the block shelf equipment in Bewdley South is all of BR(W) design, meaning the signalling in the box largely represents a 1950s/60s scene (though quite different to Bewdley South in that period due to post-preservation alterations).
Levers and Lever Leads
The following photographs show the levers and lever leads at Bewdley South.

Levers 0 to 10. Lever 8 is spare.

Levers 7 to 15. Lever 8 is spare. Not visible is Lever 11.
Levers 14 to 22. Not visible is Lever 22.
Levers 23 to 33.


List of levers
| No. | Colour | Description | Lever Sequence |
|---|---|---|---|
| 0 | Yellow | From Kidderminster Distant | 1 6 |
| 1 | Red | From Kidderminster Home | 23 22 13 12 or 22 13 12 or 17 16 15 12 |
| 2 | Red/Brown | Acceptance Lever From Kidderminster | |
| 3 | Red | From Hartlebury To Down Main Home | 23 22 21 or 22 21 |
| 4 | Red | From Hartlebury To Back Platf'm Home | 17 16 15 12 10 |
| 5 | Red+White Band | From Hartlebury To Down Main Inner Home | 22 21 |
| 6 | Red+White Band | From Kidderminster To Down Main Inner Home | 22 13 12 |
| 7 | Red+White Band | From Kidderminster Or Hartlebury To Back Platf'm Inner Home | 17 16 15 12 11 |
| 8 | SPACE | ||
| 9 | Red | From Kidderminster To Down Sidings Inner Home | 23 22 13 12 |
| 10 | Black | Facings Xover | 17 16 15 12 |
| 11 | Blue/Brown | Interl'k'g Lever With Bewdley North For Back Road | |
| 12 | Blue | F.P.L.s For Nos. 10 & 13 | 23 22 13 or 22 13 or 17 16 15 |
| 13 | Black | From Kidderm'tr Facing / Main | |
| 14 | Red | Disc for No. 18 | 16 18 |
| 15 | Blue | F.P.L for No. 16 | 17 16 |
| 16 | Black | Up Main / Back Platf'm | |
| 17 | Blue | F.P.L for No. 18 | |
| 18 | Black | Back Platf'm / Rock Siding | |
| 19 | Red | Disc for No. 18 | 16 18 or 17 16 15 12 10 [PUT BACK 12 15 17] 18 |
| 20 | Red | From Hartlebury To Down Sidings Inner Home | 23 22 21 |
| 21 | Black | Stourport Line Safety | |
| 22 | Blue | F.P.L for No. 23 | NIL or 23 |
| 23 | Black | Down Main Facing / Down Sidings | |
| 24 | Red | Disc for No. 13 | 13 |
| 25 | Red | Disc for No. 13 | 21 |
| 26 | Red | Disc for No. 23 | 13 23 24 or 21 23 25 |
| 27 | Blue/Brown | Interl'k'g Lever With Bewdley North For Down Main (Backing) | |
| 28 | Red | Back Platf'm To Hartlebury Home | 17 16 15 12 10 PUT BACK 12 15 17 |
| 29 | Red | Up Main To Hartlebury Home | 17 16 15 12 10 PUT BACK 12 15 16 |
| 30 | Red+White Band | To Kidderm'tr Start'g | |
| 31 | Red | Back Platf'm To Kidderminster Home | 16 |
| 32 | Red | Up Main To KidderMinster Home | |
| 33 | Yellow | Up Main Distant | 32 30 |
History before preservation
Construction of the first two signal boxes at Bewdley was authorised by the GWR Board in October 1877 as part of the opening of the Kidderminster Loop Line. They were the first 'proper' signal boxes on the Severn Valley Railway, all other boxes dating from after 1880[3]. There is uncertainty as to whether Bewdley North and Bewdley South are these original 1877/78 build boxes or later (19th century) replacements.
The box has had three lever frames during its life. The original 28-lever McKenzie and Holland lever frame was replaced in September 1909 with a 31 (or 32) lever frame, and replaced again circa 1923 with a GWR 32-lever 4" 3-bar vertical tappet frame.[4] The interlocking has had minor alterations in preservation to suit preservation needs, but much is as it was prior to 1970.
Bewdley South signal box closed under BR ownership on Saturday 3 January 1970. The Train Register recording the closure was formerly on display in The Engine House at Highley.
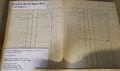
Bewdley South Train Register

Signalling controlled from the Box

The wooden posts on the larger bracket were replaced in 2006 but were declared unsafe in 2020.[5] Between 28 September and 2 October 2020, under an absolute possession, the wooden Inner Home bracket was removed using a MEWP (a rail mounted Mobile Elevated Working Platform) and the Bridgnorth steam crane. Temporary signals consisting of a 35 foot metal post carrying signals 6, 7 and a fixed distant, and a double disc ground signal carrying signals 9 and 14 were installed at the same time and were commissioned on 2 October 2020. The wooden post was removed to Bewdley Yard for stripping down. It is planned to construct a replacement wooden bracket signal.
Signals 0 and 33, the Down and Up Distants respectively, are motor worked. Signal 33 is mounted beneath Bewdley North's Signal 3, and is electrically slotted.
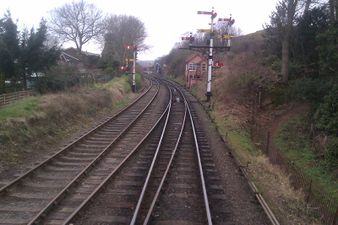
Footplate view of the signals

See also
References
- ↑ http://nrha.org.uk
- ↑ Severn Valley Signalmen Facebook group
- ↑ Marshall (1989), p128
- ↑ Signal Box Register, Volume 1: Great Western, revised 2011 edition, Signalling Record Society (plus correction sheet #9 )
- ↑ Express Points newsletter, September 2020 (Retrieved 29 August 2020)